Build a Retaining wall with natural stone
Building a retaining wall is a rather difficult and very heavy job, but it is also one of the construction works that gives your garden its own profile. Since the wall changes the garden radically, you should plan carefully before you start.
Use paper and pencil and draw the wall on a plot map with the correct dimensions. Then circle the plants you want to plant in or near the wall. Calculate the size of the mature plants so that you do not plant too densely.
If you plan well, take your time and are careful, you will get a beautifully laid wall that is well worth it.
A cold wall is, unlike a utility wall, laid instead of masonry. Both of these types of wall can be built independently or as a retaining walls. The foundation of a cold wall does not have to go down to frost-free depth, as there is room for the laid stones to move.
This does not mean that a cold wall can not be damaged by frostbite, but the risk is small, if the wall is laid correctly. If you are going to lay a free-standing cold wall, the stone should be laid with a certain slope towards the middle – from all sides.
The slope together with the weight of the stones and by wedging them into each other makes the wall stable. If you, as in our example, are to build the wall as a retaining wall between different levels in the garden, the outer wall must instead lean against the soil masses.
If you are thinking about outdoor pavers, travertine pavers are the best option. They are affordable, durable & Non-slip.
Build with stone according to availability and taste
You can use this technique with varying stone materials. If you have a rocky plot, you can pick them up and use them, instead of transporting them away. A wall with such bumps usually also gets very beautiful color changes.
If you do not have your own stone, you can either contact a quarry or a farmer nearby. The latter will probably be happy to get rid of the stones. Not even if you get the material from a quarry, it is the stone that costs money – but the shipping of it. If you prefer stones with a more regular shape, you can choose sandstone or slate. There are also blocks and so-called cobblestones of concrete.
Build walls right
When planning for the wall, you should expect it to slope towards the ground that it will support. The slope should be 15-20 percent per meter of the height of the wall. This is partly because the weight of the soil can otherwise push out the wall so that it collapses, and partly because the rainwater otherwise washes away the sand and soil that binds the stones.
If you have planted plants in the wall, the slope is also important for the plants’ existence. Therefore, make sure that you do not measure too frugally when laying the wall. The higher the wall you plan to build, the harder it is to make the wall really solid. It is important that you wedge the front stones very carefully in the so-called rear wall and that this is laid vertically towards the ground edge.
You should choose the stones for the front of the wall with great care, both to get a beautiful and stable wall. Place the largest bumps in the lower shifts. Here, the stones do not need to have a common contact area of more than about 5 centimeters.
As the wall grows, you choose smaller stones with larger contact surfaces against each other. In the upper layers, the stones must have a contact surface of at least 15 centimeters in order to lie firmly.
For the back wall, choose slightly smaller stones of a more irregular shape. They are easy to wedge between the larger front stones. Gradually fill in the gaps between the stones with sand and / or soil.
Build a wall – or more
If you have a level difference that requires the wall to be one meter or more, you should not build it yourself but leave the job to a professional. The risk of the wall starting to slide increases with height and it can be difficult for a layman to assess what needs to be done to prevent this.
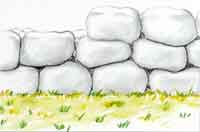
A common height of this type of wall is 70-80 centimeters. If you have higher level differences, you can instead lay two or three retaining walls on the floor. Then you can get a nice sitting or planting area between the walls.
If you are planting plants between two levels, remember to also put paving slabs here and there, so that you can stand firmly when clearing the flower beds.
Choose the right plants for the wall
If you want to plant in the wall, it is important that you choose plants that are well suited for this, a bit meager and cramped environment. Among the ground-covering, perennials, there are many species that grow well in the cold wall. To get as much enjoyment from the flower splendor as possible, you should choose species with different flowering times.
For example, you can let a purple bract begin flowering in early spring and let it be replaced by blue-purple reed sucker and white silver heritage. The latter has decorative silvery leaves throughout the summer.
Carnation has white, fringed flowers, which smell wonderfully good during the high summer. You can combine these with several species that bloom from June and sometimes even into September.
Some examples of these are yellow nunnery herb, large-flowered ivy and autumn glitter. It can also be nice with vegetation on the crest.
Another nice plant for the ivy is the bulb, which spreads its “leaf roses” decoratively and fairly quickly. When choosing the plants in the store, make sure that they have a well-developed root system. Then the risk is much less that the plants die before they have gained a grip on their new, spartan plant environment.
Tools and materials you need when building a wall of natural stone:
Tools:
1. Excavator spade 2. Shovel 3. Spirit level 4. Ruler 5. String and sticks 6. Hammer 7. Saw 8. Chisel, possibly 9. Spit.
Material:
Stone crusher, Drainage gravel, Drainage pipe, possibly Sand, Food soil, possibly Peat, possibly Plants, possibly Nails, Lath 1/2 / 1 ”Stone in different sizes eg 8-20 cm high and 25-30 cm deep.
Planning when to build a wall
1. Measure how high and long a wall you want.
2. Draw the plot, with the correct dimensions, on squared paper.
3. Draw the wall and the plants you want in and around the wall.
4. Check with the building committee if you need a building permit.
5. Bring home all materials, including any plants.
6. Dig the ditch and prime with a stone crusher.
7. Build the stone wall. If you are going to plant, do so while the wall is growing.
Worth knowing
You may need a building permit when you are going to build in the garden. If you are at least unsure, you should therefore contact the building committee in your municipality and check which regulations apply. If you are going to plant in the wall, you can mix clay soil with water and add grass clippings or peat. Then you get a good mix, which both binds the stones and where most rock party plants thrive.
Build a Retaining wall with natural stone
Measure and mark with wooden sticks where you should have the wall. Tighten a rope between the pegs and dig a ditch to the entire length of the wall. The depth should be 40-50 cm. The width of the ditch depends on the height of the wall.
Calculate as follows: the width of the largest stones (should be about 30 cm) + the thickness of the back wall (should then be about 25 cm) + 20% of the height of the wall. If the wall is to be 70 cm high, you must add 14 cm for this and the width of the ditch will be about 70 cm.
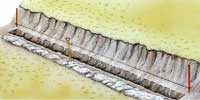
Build the wall with a 15-20% slope inwards / meter high wall. Calculate the slope. Make two templates as follows:
Use batten, saw to a piece that is as high as the wall and one that is another 5 cm. Nail the pieces of wood to a “wooden base”.
Use a spirit level and tilt the longer board towards it with the same height as the wall. Nail them together when you have the right slope. Place nails at regular intervals and at the same height on both templates.
Anchor the templates in the ground and tighten a rope in between. Lay the wall with the string as a guideline. Move the string as the wall grows.
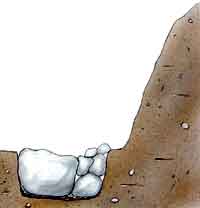
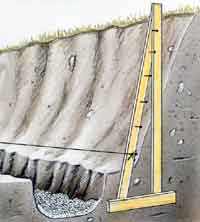
The first row of stones is laid below the ground. Place large, sturdy stones in the front edge. Behind these you put smaller stones, which are carefully wedged. The stones behind form the back wall. Make sure that the back wall partly locks the front stones, partly is so stable that it can hold against the ground as it is supposed to support.
It is important that the front wall has the correct slope and that the back wall is laid vertically against the soil masses. In the lower part of the wall, the front stones need not have more than 5 cm of the contact area. The higher up on the wall you get, the larger the contact area the stones must-have. This is so that the wall does not slip.
When the visible part of the wall is to be built, you must choose each stone with great care. You should do this partly to be beautiful and partly so that the stones will fit together so that the wall is stable.
If you choose to build a round stone in the front wall, the wall should slope slightly further back so that sand and soil are not washed away with the rainwater from the wall.
It’s not just about putting the stone in place and wedging it with the back wall. You must make sure that the stones in the different shifts have a displacement of 10-15 cm for the wall to be stable.
As you build the wall, the cavities between the stones should be filled. You can use sand if you are not going to grow in the wall. If, on the other hand, you are going to plant plants, you should instead fill in, for example, topsoil and peat.
It is important that you make sure that there is plenty of soil in the planting pockets, but also that the soil has contact with the ground behind the back wall. This is so that the roots have the opportunity to develop properly and be able to pick up new nutrients.
If you are going to plant plants in the wall, you should do so while the wall is being laid. Create a gap between two boulders, where you want to plant. Bottom with the soil mixture in the gap and fill in the cavities around the planting site and through the back wall.
Shape the root ball of the plant and wedge it into the gap. Fill with additional soil around the plant, through the back wall and to the solid soil edge.
As you build the wall and it gets higher up, for the sake of stability, choose slightly smaller stones. The wall is thus narrowed by something. It is also important to make sure that the stones fit better and better with each other.
The stones in the upper shifts should have a common contact surface of at least 15 cm to be able to withstand the underlying weight.